


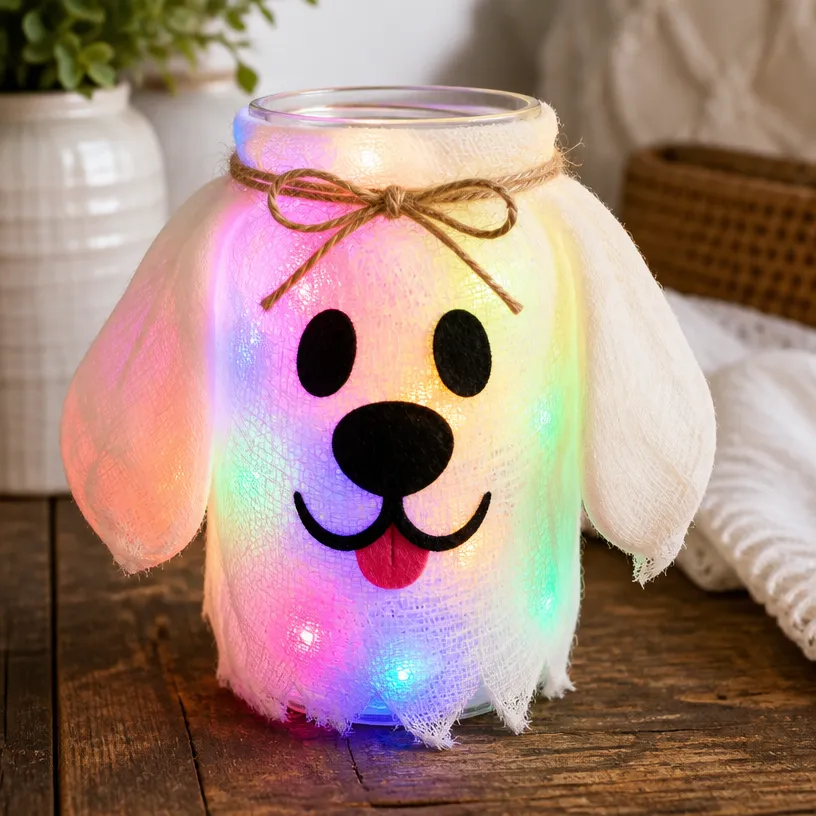
The Rainbow Puppy Ghost Mason Jar Lantern is a charming craft project perfect for adding a playful touch to your Halloween decor. This lantern combines a whimsical design with the warm glow of candlelight, making it ideal for brightening up your porch, front door, or even your dining table during spooky season. With manageable materials and easy steps, this project is approachable for crafters of all skill levels, allowing anyone to create a unique piece of handmade decor. You may also find Diy Rainbow Stained Glass Mason Jar Bat Lantern useful.
What makes this project particularly appealing is its seasonal versatility. It’s not just for Halloween; you could easily shift the color scheme or embellishments to engage with other holidays. Imagine showcasing a similar lantern embellished for spring with florals or summer with bright, cheerful colors. This approach encourages crafting with different themes, fully embracing the spirit of each season. You may also find Glowing Rainbow Puppy Ghost Lantern Halloween Decor useful.
Why You’ll Love This Rainbow Puppy Ghost Lantern
The Rainbow Puppy Ghost Mason Jar Lantern is not only fun to make but also brings a light-hearted vibe to your home. The easy-to-follow construction makes it an accessible project for families or friends who want to gather for a crafting night. Plus, the final product exudes farmhouse charm, enhancing any rustic or contemporary style with its vibrant colors and soft glow.
Another benefit of this project is its budget-friendly nature. The materials are usually inexpensive or can be repurposed from items you might already have at home. This makes the project not only affordable but also environmentally conscious. You can customize each lantern to fit your space or personal taste, whether you go for traditional Halloween colors or explore a more modern palette.
Before You Start
Before diving into the fun of crafting, it’s a good idea to have a clear vision of what your finished lantern will look like. Expect to create a colorful ghost figure that brings joy and light wherever you place it. Pay special attention to the painting and decorating stages, as these will influence the overall mood and feel of your lantern.
To simplify the process, set up a dedicated workspace with all your materials laid out. This preparation will help you transition smoothly through each step without searching for supplies mid-project.
“A handmade touch makes every home feel warmer.”
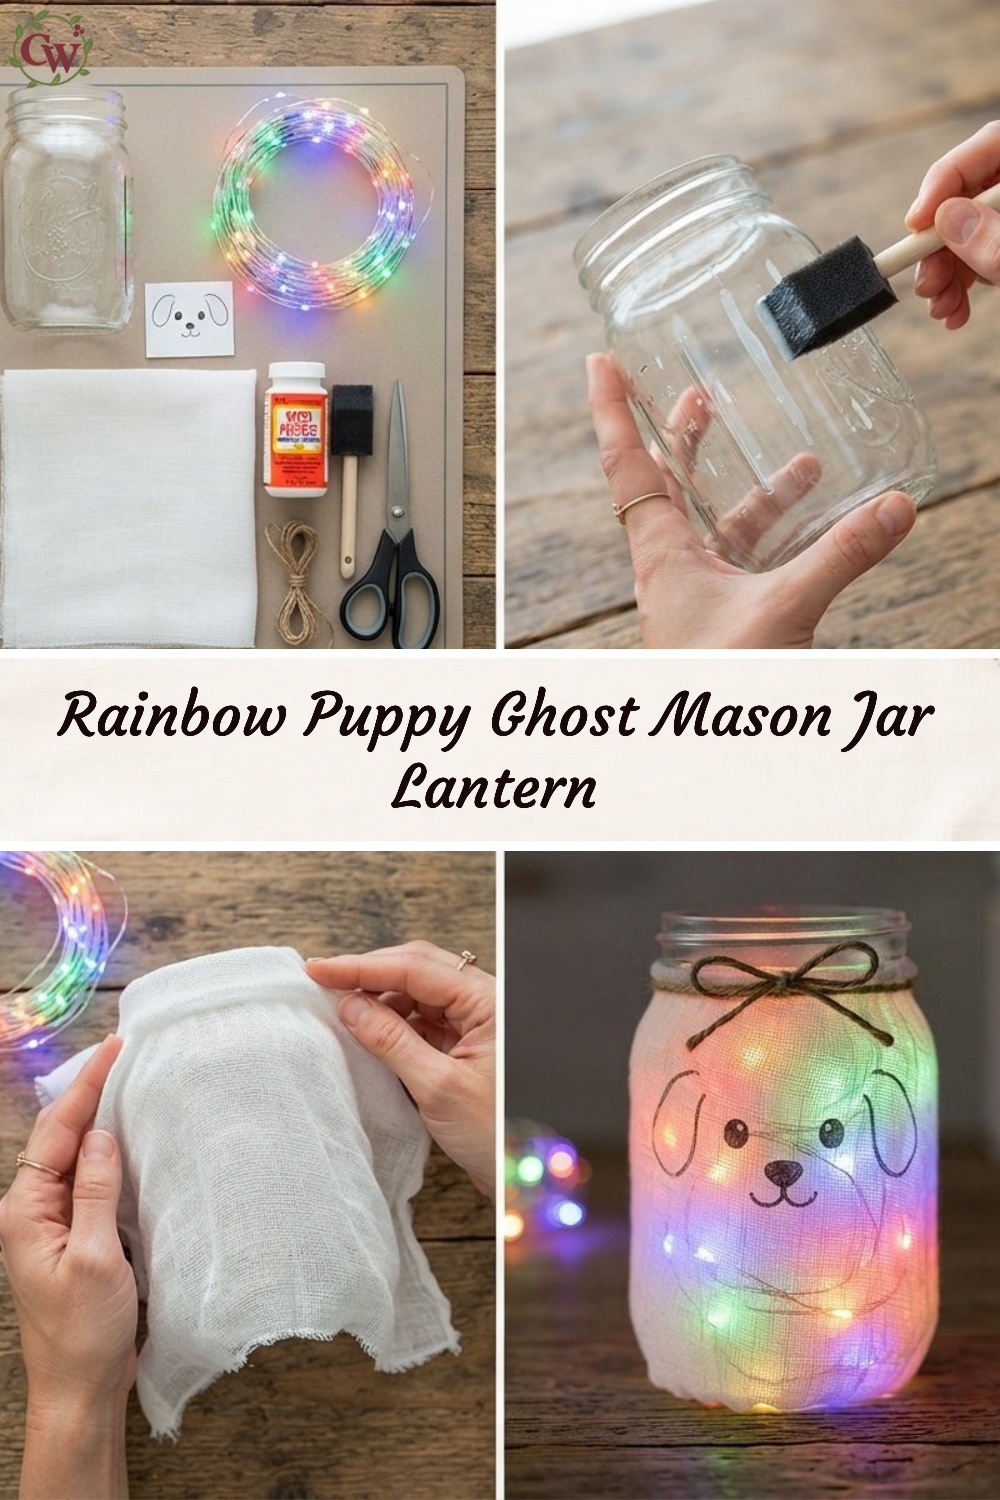
Materials and Supplies
Materials and Supplies
- Mason jar
- White paint (acrylic or glass paint)
- Colorful tissue paper (rainbow colors)
- Mod Podge or glue
- Black felt or paper (for eyes and mouth)
- LED tealight candle (for safety)
- Paintbrush
- Scissors
- Crafting tools (optional)
When choosing paint, look for a product that suits glass surfaces well and has a non-toxic finish. The size of the mason jar matters too; a pint jar works well for this project without overwhelming the space where you’ll display it.
How to Make Rainbow Puppy Ghost Mason Jar Lantern
Step 1: Prepare the Mason Jar
Start by cleaning the mason jar thoroughly to ensure the paint adheres well. Once dry, apply a base coat of white paint to give your lantern a ghostly appearance. Allow this layer to dry completely.
Step 2: Create the Ghost Face
While the white paint is drying, cut out the shapes for the eyes and mouth from black felt or paper. Once your base layer is dry, carefully glue these pieces onto the jar. This defines the character of your ghost and makes it easily recognizable.
Step 3: Add Colorful Tissue Paper
Next, cut the colorful tissue paper into small squares or shapes. Using Mod Podge, start layering the tissue onto the jar, creating a rainbow effect. This stage allows for creativity, so feel free to experiment with different placements and colors. Ensure to cover all white parts of the jar for a vibrant look.
Step 4: Seal It
After layering your tissue paper, let it dry for a few minutes. Then, apply a final layer of Mod Podge over the entire jar to seal your design. This step also adds a nice glossy finish and helps protect your artwork.
Step 5: Place the Light Source
Once everything is set and dry, place the LED tealight candle inside the mason jar, and voila! You now have a delightful Rainbow Puppy Ghost Mason Jar Lantern to display.

How to Style Your Finished Rainbow Puppy Ghost Mason Jar Lantern
To maximize the impact of your Rainbow Puppy Ghost Lantern, think about where you’d like it to shine. It fits beautifully on a mantel as a festive statement piece. Alternatively, place it on your front porch to welcome trick-or-treaters with a warm glow. You can also arrange it on your dining table for a playful touch during Halloween gatherings.
For a more cohesive look, consider pairing it with other handmade lanterns, like the Rainbow Haunted Mason Jar Lanterns. These can create a charming display that captures the joyous spirit of the season without cluttering your space.
Maggie’s Tips for the Best Results
- Dry-Fit Pieces: Always arrange the components before gluing to ensure you like the layout.
- Work in Layers: Layer the Mod Podge and tissue paper carefully to create depth.
- Let Paint Dry Completely: This prevents smudging and ensures a crisp finish.
- Balance Your Colors: When applying the tissue paper, use a balanced approach to avoid overwhelming the design.
- Minimal Hot Glue: Use just enough glue to hold pieces in place without excess oozing out.
Easy Ways to Customize This Project
Explore a variety of ways to personalize your Rainbow Puppy Ghost Lantern. You might consider changing the tissue paper colors to fit different seasons, like using pastel shades for spring or warm earth tones for autumn. You can also experiment with different decorations, such as using glitter for added sparkle or adding embellishments like twine or buttons.
If you’d like to make it a family affair, have the kids create their own versions, guiding them on how to use their favorite colors. Another fun idea is to incorporate themed lights or switch to a larger jar for a more dramatic effect.
Caring for Your Handmade Decor
To keep your Rainbow Puppy Ghost Lantern looking fresh, keep it in a dry place away from direct sunlight to prevent fading. If it gets dusty, gently wipe it with a soft cloth. Storing your lantern in a padded box during the off-season can help preserve its appearance.
FAQs About Rainbow Puppy Ghost Mason Jar Lantern
What if I want to use real candles?
It’s safest to stick with an LED tealight to avoid fire hazards, especially if you use tissue paper.
Can I use different types of jars?
Absolutely! Any glass jar works well, but keep in mind that different sizes will create different visual impacts.
How long does the Mod Podge take to dry?
Typically, Mod Podge dries to touch within 15 minutes, but it’s best to allow a couple of hours for it to cure completely for a strong seal.
Can I change the colors of the ghost face?
Of course! You can use paint instead of felt for different textures or even paint the entire jar in various designs.
A Handmade Touch for the Season
Crafting your own Rainbow Puppy Ghost Mason Jar Lantern is a delightful way to celebrate the Halloween season while creating something truly unique. Remember, it’s not about perfection; it’s about the love and creativity that goes into making something by hand. This charming lantern can bring warmth and a hint of whimsy to your space, reminding us all to embrace the joy of crafting.
For more creative ideas, you might enjoy exploring this Northern Lights Winter Landscape Art Lesson for further artistic inspiration.
Print
Rainbow Puppy Ghost Mason Jar Lantern
- Total Time: 90 minutes
- Makes: 1 lantern
Description
A charming craft project perfect for adding a playful touch to your Halloween decor.
Materials
- Mason jar
- White paint (acrylic or glass paint)
- Colorful tissue paper (rainbow colors)
- Mod Podge or glue
- Black felt or paper (for eyes and mouth)
- LED tealight candle (for safety)
- Paintbrush
- Scissors
- Crafting tools (optional)
Instructions
- Prepare the Mason Jar by cleaning it and applying a base coat of white paint.
- Create the ghost face by cutting eyes and mouth shapes from black felt or paper and gluing them on.
- Add colorful tissue paper in layers using Mod Podge to create a rainbow effect.
- Seal the jar with a final layer of Mod Podge for protection and a glossy finish.
- Place the LED tealight candle inside the jar and enjoy your decorative lantern!
Notes
You can customize the lantern for different seasons by changing the tissue paper colors and decorations.