


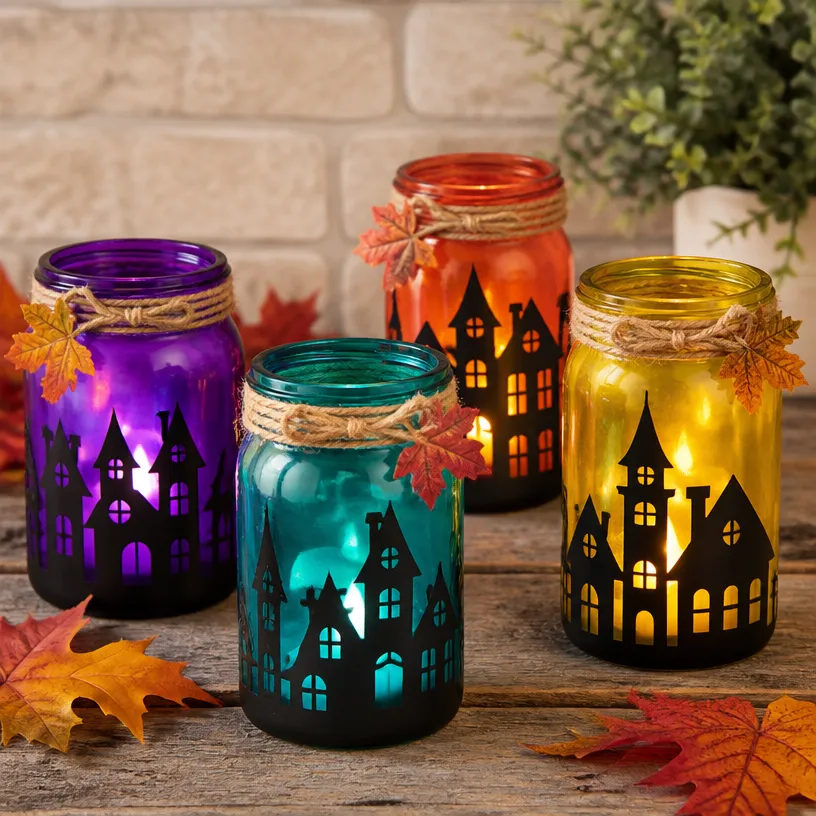
Colorful Haunted Village Mason Jar Lanterns are a fun and charming crafting project perfect for celebrating the Halloween season. These lanterns serve as whimsical night lights, illuminating your home with a warm glow while showcasing delightful decorations. Whether placed on your mantle, adorning your porch, or lighting up an entryway, these jars are sure to create a festive atmosphere that captures the spirit of Halloween. What’s great about this project is its approachability; even novice crafters can enjoy it without feeling overwhelmed. You may also find Colorful Ghost Mason Jar Lanterns Halloween Decor useful.
Why You’ll Love This Project
Crafting Colorful Haunted Village Mason Jar Lanterns is an excellent way to bring a touch of Halloween spirit into your home. The project employs simple and inexpensive materials, making it a cost-effective option for seasonal decoration. Additionally, the versatility of these lanterns allows you to customize colors and styles to match your personal taste or seasonal themes. Display them on your dining table, front door, or as part of your Halloween festivities. Plus, they carry that rustic farmhouse charm that makes decorations feel welcoming and homemade. You may also find Rainbow Haunted Mason Jar Lanterns Halloween useful.

Before You Start
This project results in bright, charming lanterns that resemble a haunted village when lit from within. The most attention should be given to how you choose to paint your jars; this will influence the overall brightness and color of the lights. Ensure your workspace is prepared by covering the table and gathering all necessary materials. This preparation will make the crafting process smooth and enjoyable.
“A handmade touch makes every home feel warmer.”
Materials and Supplies
Materials and Supplies
- Mason jars (variety of sizes works best)
- Glass paint or acrylic paint (choose vibrant colors for a fun effect)
- Paintbrushes (various sizes)
- Battery-operated tealight candles or LED tealights
- Black markers or sharpies
- Fake cobwebs (optional for added spooky effect)
- Ribbon or twine (optional for a decorative touch)
- Water for cleaning brushes
When selecting your paint, consider how transparent or opaque you want the colors to be, as this will affect the light’s intensity. Using battery-operated tealights ensures safety, especially if you decide to display these lanterns indoors.
How to Make Colorful Haunted Village Mason Jar Lanterns
Step 1: Prepare the Mason Jars
Start by thoroughly cleaning the mason jars to remove any dust or residues. Once clean, dry them completely. For a base layer, you may choose to apply a coat of white paint if you wish to create a lighter foundation for your vibrant colors.
Step 2: Paint Your Jars
Using your chosen colors, begin painting the outsides of your jars. Depending on the look you desire, you may want to use a sponge brush for a textured effect. Allow the first layer to dry completely before adding additional layers or different colors. Aim for even strokes to prevent streaks.
Step 3: Add Windows and Features
Once the paint is dry, use black markers or sharpies to draw haunted house features like windows, doors, and other spooky accents. Don’t worry about perfection; the charm lies in those handmade imperfections that add character to your lanterns.
Step 4: Assemble the Lanterns
Once your jars are completely dry, place a battery-operated tealight inside each jar. You can add fake cobwebs around the rim for that extra Halloween touch if desired.
Step 5: Final Touches and Display
Consider adding some twine or ribbon around the neck of the jars for a rustic feel. Now, your Colorful Haunted Village Mason Jar Lanterns are ready to shine! Position them wherever you want to enhance the spooky atmosphere – on your porch, dining table, or window sills.
How to Style Your Finished Colorful Haunted Village Mason Jar Lanterns
Once your Colorful Haunted Village Mason Jar Lanterns are complete, you can creatively display them to set the tone for Halloween. They look charming on a mantelpiece paired with some autumn decorations like pumpkins or dried leaves. Another lovely display idea is to hang them from hooks on your porch, creating a whimsical path leading to your home. Alternatively, a cluster of lanterns on a dining table can serve as a delightful centerpiece for your Halloween gatherings.

Maggie’s Tips for the Best Results
- Always dry-fit your jars and tealights before committing to any placement.
- Working in layers with paint can give you a unique texture, so don’t hesitate to experiment!
- Consider allowing sufficient drying time between paint layers to prevent smudging.
- Practice maintaining balance with the decorations; a few features go a long way.
- Test your colors on a small area first to ensure you like the final look before applying to the entire jar.
Easy Ways to Customize This Project
Feel free to adapt the Colorful Haunted Village Mason Jar Lanterns to fit different occasions or holidays. You could choose autumn-themed colors like deep orange and forest green for a fall display, or incorporate metallic finishes for a festive Christmas look. Adding small seasonal flowers or rustic elements like branches could also enhance the project’s texture.
Caring for Your Handmade Decor
To keep your Colorful Haunted Village Mason Jar Lanterns looking their best, gently dust them periodically to avoid dust build-up. If displayed outside, consider bringing them indoors during inclement weather to protect the paint. The jars should be stored in a cool, dry place to avoid fading from direct sunlight after the Halloween season has ended.
FAQs About Colorful Haunted Village Mason Jar Lanterns
Can I use real candles instead of tealights?
It’s best to use battery-operated tealights for safety, especially if displaying the lanterns indoors.
How long does the paint take to dry fully?
Drying times can vary based on humidity and temperature, but generally, it’s advisable to allow at least 2-4 hours between layers.
How can I achieve a more translucent look with my colors?
Use a lighter hand when applying paint and consider mixing with a glazing medium for a more transparent effect.
Are there alternatives to glass jars?
You can use plastic jars, but they may not provide the same appearance as traditional glass; however, they are lighter and less prone to breakage.
A Handmade Touch for the Season
Creating Colorful Haunted Village Mason Jar Lanterns is not just a delightful craft but a wonderful way to enhance your home with a personal touch. The warmth of handmade decor invites charm into your space, making it feel welcoming and special for the Halloween season. Remember, there is beauty in the imperfections, and every crafted piece tells a story. Embrace the joy of creating and enjoy sharing your colorful lanterns with family and friends.
Conclusion
For a fantastic experience crafting these lanterns, I recommend exploring this DIY Haunted Rainbow Village Mason Jar Lanterns Halloween Decor project that complements the ones you’ve just made. Enjoy the process and the lively spirit it brings into your home!
Print
Colorful Haunted Village Mason Jar Lanterns
- Total Time: 2 hours
- Makes: 4 lanterns
Description
Create charming Halloween lanterns using mason jars and vibrant colors to illuminate your home.
Materials
- Mason jars (variety of sizes)
- Glass paint or acrylic paint (vibrant colors)
- Paintbrushes (various sizes)
- Battery-operated tealight candles or LED tealights
- Black markers or sharpies
- Fake cobwebs (optional)
- Ribbon or twine (optional)
- Water (for cleaning brushes)
Instructions
- Prepare the Mason Jars by cleaning them thoroughly.
- Paint the outsides of your jars with chosen colors.
- Add windows and features with black markers once dry.
- Assemble the lanterns by placing a battery-operated tealight inside each jar.
- Consider adding twine or ribbon for final touches.
Notes
For best results, experiment with layering paint and allow sufficient drying time.