Description
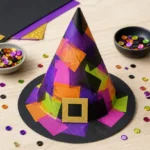
A delightful and easy crafting project for kids to create vibrant witch hats for Halloween decoration.
Materials
- Colored construction paper (black, purple, orange, etc.)
- Markers or crayons
- Scissors
- Glue or glue sticks
- Glitter (optional)
- Stickers (optional)
- Ribbon or yarn for embellishment
- Straws or small sticks for support
Instructions
- Gather Your Materials: Start by collecting all your supplies on a clean surface.
- Create the Hat Base: Take a piece of black paper and cut it into a large circle for the witch hat’s brim.
- Form the Hat Cone: Cut a triangle shape from another piece of paper for the hat’s top and roll it into a cone shape.
- Attach the Cone to the Brim: Glue the base of the cone to the center of the larger circle.
- Decorate Your Hat: Use markers, glitter, ribbons, stickers, or any decorative embellishments to personalize.
- Add Support: Insert a straw or small stick into the base and secure it with glue.
- Display Your Creation: Find a perfect spot in your home to showcase the finished witch hats.
Notes
Encourage creativity by trying different colors and personalization options.