


The rainbow driftwood photo display is a creative and charming way to showcase your cherished memories. This project adds a touch of rustic elegance to your home while harnessing the beauty of nature. It’s perfect for various settings from a cozy mantel or a bright entryway to your summer porch. With its approachable materials, even beginner crafters can enjoy this rewarding project. You may also find Diy Rainbow Apple Mason Jar Lantern For Teachers useful.
Using pieces of driftwood, vibrant paints, and twine, you can craft a unique display that captures the joy of summer. Each photo can represent a special moment, making the display both decorative and personal. If you’re exploring other seasonal crafts, consider checking out this DIY Summer Nature Scavenger Journal for additional inspiration.
Why You’ll Love This DIY Rainbow Driftwood Photo Display
This project is delightful for several reasons. First, its construction is quite straightforward, making it ideal for all crafting skill levels. You’ll mainly need driftwood, a few vibrant colors, and your favorite photos. The materials are not only inexpensive but also often reusable, which adds to the project’s appeal. You may also find Autumn Leaf Wreath Diy Rainbow Puppy Paw Prints useful.
Moreover, the rainbow driftwood display is perfect for seasonal decorating or simply adding a touch of charm to your home. It’s versatile ideal for a mantel, a dining table centerpiece, or a cheerful accent on a shelf. Every crafter can customize it to fit their home’s style, ensuring it resonates beautifully in any setting.

Before You Start
Before diving into the project, envision what your finished photo display will look like. This display should feel vibrant, airy, and very much alive with color. As you work on it, pay careful attention to how you’ll arrange your photos on the driftwood, as this visual aspect is crucial to its overall appeal.
Creating a tidy workspace will also make things more manageable. Gather all your materials in advance, so you can focus on enjoying the crafting process.
“A handmade touch makes every home feel warmer.”
Materials and Supplies
Materials and Supplies
- Driftwood pieces (varied sizes)
- Acrylic paints (rainbow colors)
- Natural twine or string
- Photos or prints
- Craft glue
- Scissors
- Paintbrushes
- Optional: Sandpaper (for smoothing rough edges)
When choosing driftwood, look for pieces that vary in size and shape to create a more interesting display. The paint can be any color of your choice, but vibrant, summer-inspired hues work best to reflect the season’s warmth. Using twine instead of a metallic wire keeps the rustic feel intact.
How to Make DIY Rainbow Driftwood Photo Display for Summer Charm
Select Your Driftwood Pieces: Gather your driftwood and select pieces that complement one another in size and shape. Arrange them on a flat surface to visualize how they will fit together.
Smooth Edges: If any pieces have sharp edges, use sandpaper to smooth them down. This step ensures your display is safe to handle.
Apply Color: Using the paintbrush, apply your chosen acrylic colors to the driftwood. Feel free to use a sponge for a textured look or blend colors for a gradient effect. Allow the paint to dry completely.
Arrange Photos: Lay your photos out on the driftwood to find the best arrangement. You can adhere photos using craft glue or twine. If using twine, create small loops to hang the pictures from the driftwood.
Attach the Pieces: Once satisfied with the arrangement, securely attach the driftwood pieces together using glue. Allow it to set according to the glue instructions.
Final Touches: After assembly, give everything a final look. Make sure the photos are securely attached and the driftwood is stable.
Display Your Creation: Find a special place for your rainbow driftwood photo display that fits seamlessly into your summer decor.
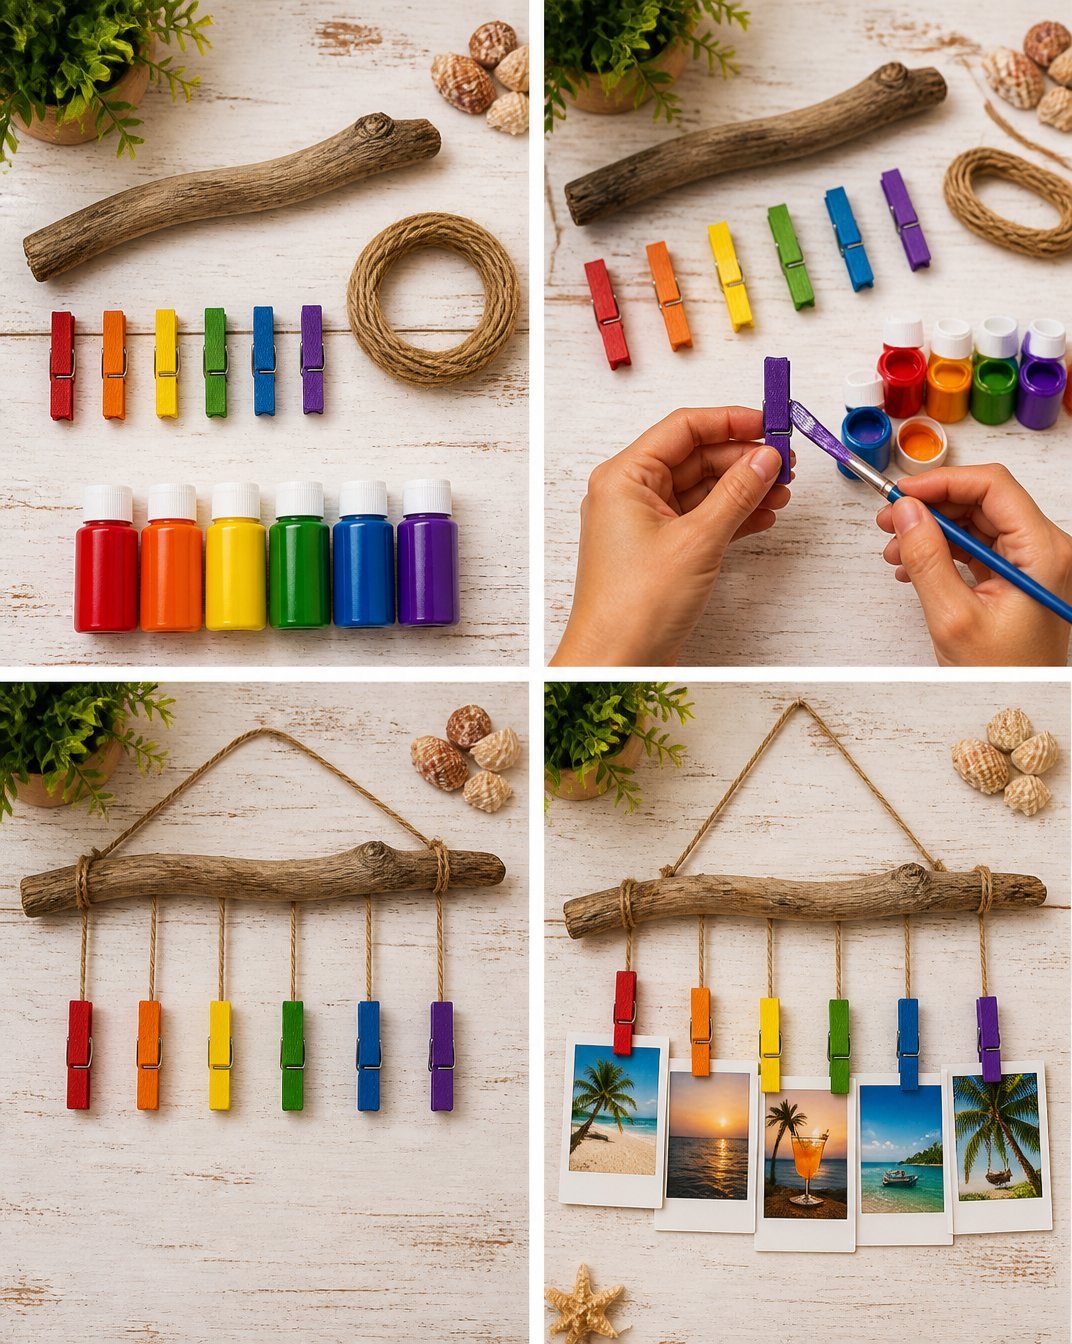
How to Style Your Finished DIY Rainbow Driftwood Photo Display for Summer Charm
Once your project is complete, consider how to style it within your home. A great spot for your rainbow driftwood photo display is the mantel, where it can serve as a vibrant focal point. Alternatively, place it on a dining table adorned with some seasonal florals or a cozy entryway bench for a welcoming touch.
Pair it with other soft textures like woven baskets or natural wood elements to create a harmonious look. Remember, the goal is to keep it warm and inviting, reflecting the joy of summer without being overly cluttered.

Maggie’s Tips for the Best Results
- Before gluing, dry-fit the pieces to see how they look together without taking the final step.
- Work in layers when combining photos and driftwood, as this adds depth and interest.
- Allow paint to dry thoroughly between layers to avoid any unwanted smearing.
- Balance greenery with your photos to keep the display lively and engaging.
- Avoid using excess glue to keep your finish clean and professional.
- Keep the ribbon tails proportional to your photos for a well-executed design.
- Test the placement of your photos on the driftwood before finalizing the arrangement.
Easy Ways to Customize This Project
Easy Ways to Customize This Project
You can personalize your rainbow driftwood photo display in numerous ways. Consider the colors and themes of the season. For instance, in the fall, rich oranges and browns may provide a warm touch, while winter could evoke a feeling of calm with blues and whites.
You might also think about changing the photos seasonally. Different cherished memories can be showcased as the months change, turning the display into a living scrapbook.
Caring for Your Handmade Decor
Caring for Your Handmade Decor
To maintain your handmade photo display, keep it away from direct sunlight to prevent the colors from fading. Occasionally dusting it will help preserve its charming appeal. If using faux greenery or flowers, replace them as needed to keep your display fresh.
If you need to pack the project away at the end of the season, wrap the driftwood and photos carefully to avoid damage. Store it in a dry environment to ensure it remains in good condition.
FAQs About DIY Rainbow Driftwood Photo Display for Summer Charm
What types of photos work best for this project?
Any photo can work, but lighter colors and brighter images tend to stand out against natural driftwood.
Can I use real flowers in addition to photos?
Absolutely! Just keep in mind they may require additional care or replacement as they wilt.
How long does the paint take to dry before I can assemble everything?
This can vary based on the brand of paint, but it’s generally wise to allow at least 1-2 hours for a thorough drying.
Is outdoor placement suitable for this project?
While it can be used outdoors, ensure it is out of direct rain exposure to protect your photos and materials.
A Handmade Touch for the Season
Crafting a DIY rainbow driftwood photo display is not just about creating a decorative piece; it’s about honoring the memories captured within those photographs. When you engage in this project, you’re inviting charm, personal history, and a handmade touch into your home. Remember, it doesn’t have to be perfect to resonate beautifully; the essence of handmade decor lies in its heart and authenticity.
For more seasonal inspiration, check out these 72 summer mantel decorating ideas that are trending this year! and embrace the joy of crafting through the seasons.
Print
DIY Rainbow Driftwood Photo Display
- Total Time: 15 minutes
- Makes: 1 display
Description
Create a charming and vibrant rainbow driftwood photo display to showcase cherished memories with a touch of rustic elegance.
Materials
- Driftwood pieces (varied sizes)
- Acrylic paints (rainbow colors)
- Natural twine or string
- Photos or prints
- Craft glue
- Scissors
- Paintbrushes
- Optional: Sandpaper (for smoothing rough edges)
Instructions
- Select your driftwood pieces: Gather your driftwood and select pieces that complement one another in size and shape.
- Smooth edges: If any pieces have sharp edges, use sandpaper to smooth them down.
- Apply color: Using the paintbrush, apply your chosen acrylic colors to the driftwood, allowing it to dry completely.
- Arrange photos: Lay your photos out on the driftwood to find the best arrangement.
- Attach the pieces: Securely attach the driftwood pieces together using glue.
- Final touches: After assembly, ensure the photos are securely attached and the driftwood is stable.
- Display your creation: Find a special place for your rainbow driftwood photo display that fits beautifully into your summer decor.
Notes
Keep the display away from direct sunlight to prevent colors from fading, and regularly dust it to maintain its charm.