

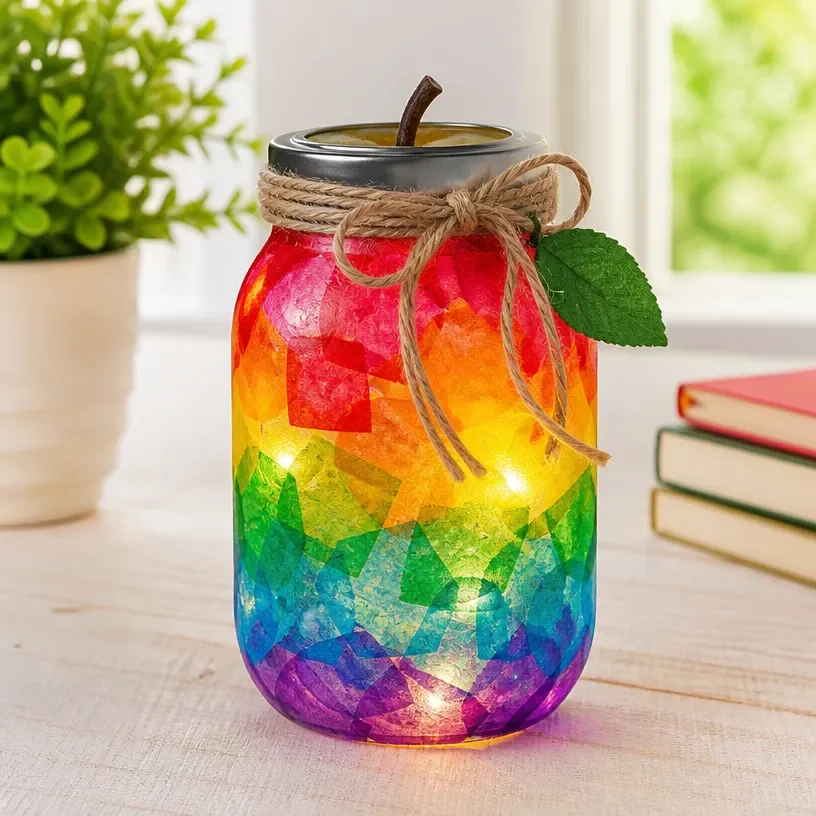
The Rainbow Apple Mason Jar Lantern for Teachers is a delightful and creative way to show appreciation for educators. This charming project is a perfect blend of rustic farmhouse style and vibrant colors, making it an attractive addition to any classroom or home decor. Display it on a desk, a mantel, or as part of a seasonal centerpiece to brighten up any space. The approachable nature of this craft makes it great for both novice and experienced crafters. You may also find Diy Colorful Rainbow Crystal Mason Jar Lantern useful.
Why You’ll Love This Rainbow Apple Mason Jar Lantern
This Rainbow Apple Mason Jar Lantern is not only visually appealing, but it also serves as a heartfelt gift idea for teachers. The construction is straightforward, allowing for creativity without overwhelming complexity. Utilizing inexpensive materials makes it a budget-friendly choice for many, while its colorful appearance brings a sense of joy and festivity. You may also find Diy Rainbow Stained Glass Mason Jar Bat Lantern useful.

The versatility of this lantern allows it to fit seamlessly into various seasonal themes or classroom decorations. You can customize the colors and embellishments to suit any occasion, making it an engaging project for kids and adults alike. Whether you display it in your home or gift it to a favorite teacher, it channels warmth and cheer in any environment. You may also find Rainbow Haunted Mason Jar Lanterns Halloween useful.
Before You Start
Before diving into this project, envision the finished piece: a radiant lantern that embodies the charm of a hand-crafted item. Pay special attention to how you layer the colors for maximum visual impact. Clear a workspace where you can comfortably craft, ensuring you have all materials within reach to make the process smooth and enjoyable.
“A handmade touch makes every home feel warmer.”
Materials and Supplies
Materials and Supplies
- Wide mouth mason jar
- Colorful tissue paper (red, green, yellow, and blue)
- Mod Podge or other craft glue
- Paintbrush
- Tealight candle (flameless recommended for safety)
- Ribbon (for decoration)
- Scissors
Take care when choosing your materials. The size of the mason jar will influence the overall appearance, while the quality of your tissue paper will determine the brightness of the lantern’s glow. Select a ribbon that complements your chosen colors, adding a festive touch.
How to Make Rainbow Apple Mason Jar Lantern for Teachers
Prepare the Mason Jar: Start by cleaning and drying your mason jar to ensure that the tissue paper adheres well.
Cut the Tissue Paper: Cut the tissue paper into small squares or apple shapes, depending on your design preference. Aim for a variety of colors to create a vibrant display.
Apply Mod Podge: Using a paintbrush, apply a thin layer of Mod Podge to the area of the mason jar where you plan to attach the tissue paper.
Attach the Paper: Carefully place a piece of tissue paper on the glued area, smoothing out any bubbles or wrinkles. Repeat this process, layering colors for a beautiful effect.
Seal the Lantern: Once you’ve covered the jar in colorful tissue paper, apply another layer of Mod Podge over the top to seal and protect it. Allow it to dry thoroughly.
Add an Accent: Tie a ribbon around the neck of the jar for a decorative finish. This small detail enhances the overall aesthetic and adds a personal touch.
Insert the Candle: Place your tealight candle inside the mason jar. If you’re using a real candle, ensure that the jar is made to withstand heat!
Display and Enjoy: Find a cozy spot for your lantern, whether it’s on a table, a porch, or a shelf. Light it up to create a warm, inviting glow.

How to Style Your Finished Rainbow Apple Mason Jar Lantern for Teachers
Bringing your Rainbow Apple Mason Jar Lantern into your home can enhance any space. This lantern makes an excellent focal point on a dining table, entryway, or even as a centerpiece during seasonal gatherings. Pair it with complementary decor, like a simple vase of fresh flowers or a set of coordinating decorative items.
Consider placing it on a shelf with other mason jar crafts for a cohesive look. Its bright colors and rustic charm will bring warmth and joy to any setting.

Maggie’s Tips for the Best Results
- Dry-Fit the Pieces: Before gluing, dry-fit the tissue paper to see how they layer together for the best visual effect.
- Layer Your Colors: When attaching the colors, consider the order and visibility of each layer.
- Smooth Out Wrinkles: Make sure to smooth the tissue paper as you glue it down to prevent bubbles.
- Allow Drying Time: Let each layer of Mod Podge dry completely before applying the next for a glossy finish.
- Use a Flameless Candle: Always opt for a flameless tealight candle to ensure safety.
Easy Ways to Customize This Project
You can easily make this project your own! Consider using different shades of the apple colors to match a specific season or theme. Adding a sprinkle of glitter to the Mod Podge can create a sparkly effect, while a handwritten note or quote tied onto the ribbon adds a personal message. You could also paint the mason jar in soft, neutral colors for a more subdued look.
Caring for Your Handmade Decor
To keep your Rainbow Apple Mason Jar Lantern looking its best, avoid placing it in direct sunlight, which can fade the colors over time. Dust the surface gently and handle it with care during seasonal storage to prevent crushing any delicate elements.
FAQs About Rainbow Apple Mason Jar Lantern for Teachers
Can I use real candles in my lantern?
It’s best to use flameless tealight candles to ensure safety, especially since tissue paper is flammable.
What if I don’t have Mod Podge?
You can use other craft glues or even homemade glue made from flour and water, but Mod Podge provides a stronger seal.
How can I adjust the size of the lantern?
Using larger or smaller mason jars will create different lantern sizes just adjust your tissue paper accordingly.
Will the colors fade if left outside?
Yes, prolonged exposure to sunlight can fade the colors, so it’s best to place it in shaded areas or keep it indoors.
Can I use different materials instead of tissue paper?
Absolutely! You could use colored cellophane or even scrapbook paper for different textures and effects.
How do I store my lantern when not in use?
Store it in a cool, dry place, ideally in a padded box, to avoid crushing or damage.
A Handmade Touch for the Season
Creating this Rainbow Apple Mason Jar Lantern is not just about the final product; it’s about the process and the joy of crafting something personal and meaningful. This project embraces the spirit of handmade decor, reminding us that our creations don’t have to be flawless to hold beauty and significance. Each lantern is unique and reflects the care and attention put into it, adding warmth to any home or classroom setting.
For more inspiration and ideas on colorful crafts, you might want to explore additional resources, such as Rainbow & Color Crafts – DIY Glow.
Print
Rainbow Apple Mason Jar Lantern
- Total Time: 45 minutes
- Makes: 1 lantern
Description
A colorful and creative lantern project perfect for brightening homes or classrooms, ideal as a gift for teachers.
Materials
- Wide mouth mason jar
- Colorful tissue paper (red, green, yellow, blue)
- Mod Podge or other craft glue
- Paintbrush
- Tealight candle (flameless recommended for safety)
- Ribbon (for decoration)
- Scissors
Instructions
- Prepare the mason jar: Clean and dry the mason jar to ensure proper adhesion of tissue paper.
- Cut the tissue paper into small squares or apple shapes.
- Apply Mod Podge with a paintbrush on the area of the mason jar where tissue paper will be attached.
- Attach a piece of tissue paper onto the glued area, smooth it out, and repeat with additional layers.
- Seal the lantern with another layer of Mod Podge and allow it to dry thoroughly.
- Add a ribbon around the neck of the jar for decoration.
- Insert the tealight candle inside the jar.
- Display and enjoy your colorful lantern in your chosen spot.
Notes
For safety, use a flameless candle to avoid fire hazards. Customize colors and embellishments to fit various themes.