

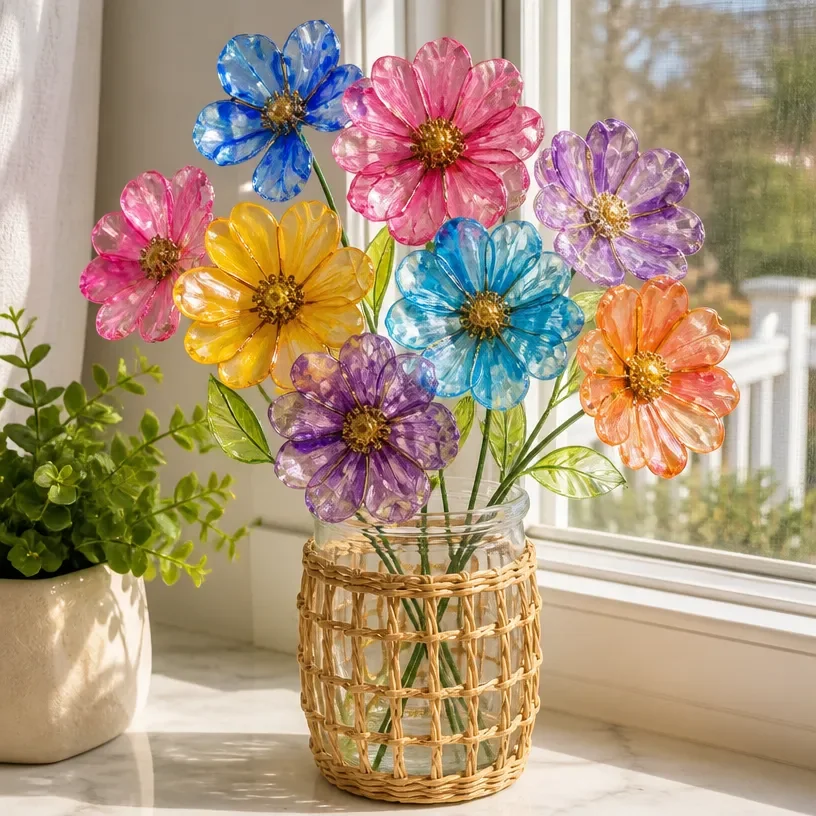
DIY Glowing Faux Stained-Glass Flowers You may also find Diy Rainbow Stained Glass Mason Jar Bat Lantern useful.
Creating your own DIY Glowing Faux Stained-Glass Flowers is not only a beautiful way to enhance your home decor but also an engaging project that allows your creativity to blossom. These vibrant blooms can add warmth and a welcoming touch to any space, whether it’s brightening up your porch, accentuating your dining table, or even serving as charming decorations for seasonal holidays. Using simple materials, this project is approachable for crafters of all skill levels, making it a delightful activity to share with friends and family. You may also find Diy Stained Glass Rainbow Window Decor Autumn Leaves useful.
Whether you’re decorating for spring or looking to add a burst of color during the colder months, these glowing faux stained-glass flowers will surely create an inviting atmosphere. The soft light filtering through the faux glass will evoke a sense of calm and warmth, encouraging anyone who sees them to stop and appreciate the handmade beauty. If you enjoy projects that infuse rustic charm with a modern twist, this one is sure to be a favorite.
Why You’ll Love This Project
The appeal of these DIY Glowing Faux Stained-Glass Flowers lies in their versatility and ease of creation. They can be made in a variety of colors and sizes to suit any season or occasion, allowing for personal customization. With inexpensive materials, you can craft multiple flowers to fill your home or use them as thoughtful gifts. If you’re looking for a project that combines creativity with functionality, these flowers are a delightful option.
These faux stained-glass flowers can be used as part of your decor all year round, whether positioned on a windowsill capturing the sunlight or as part of a centerpiece on your dining table. Their unique glowing effect at night can bring a magical touch to your evenings. For more creative flower projects, you might enjoy exploring colorful cupcake liner flowers as a fun variation to showcase your floral arrangement skills.

Before You Start
Before gathering your materials, it’s wise to envision how the finished arrangement will look in your home. Think about the colors and styles you wish to incorporate. Pay special attention to the placement of the faux glass elements this will significantly influence the final appearance of your flowers.
Ensure your workspace is clear and organized, allowing you to focus on the creative aspects without distractions. Preparing and laying out your materials can streamline the assembly process.
“A handmade touch makes every home feel warmer.”
Materials and Supplies
Materials and Supplies
- Clear plastic sheets or cut plastic from old containers
- Glass paint or faux stained glass paint
- Scissors
- Hot glue gun and glue sticks
- LED tea lights or small fairy lights
- Decorative ribbon (optional)
- Wire (optional for stems)
- A glass jar or vase (optional for display)
Choosing the right paint is essential for achieving that beautiful stained-glass effect. Glass paint is ideal since it is made to mimic the qualities of real stained glass; however, faux stained glass paint can also create stunning results. If you opt for the glass jar, consider its size in relation to your flower design.
How to Make DIY Glowing Faux Stained-Glass Flowers
Step 1: Prepare Your Flower Shapes
Start by cutting your plastic sheets into petal shapes. Depending on your design, you could choose to create large, medium, or small petals. A mix of sizes can give your flowers depth and character. Clearly outline the petals with a permanent marker for easy visibility.
Step 2: Paint Your Flower Petals
Using your chosen paint, carefully paint the flattened plastic petals. Allow the paint to dry thoroughly. If you desire a bolder effect, applying a second coat can enhance the coloring. Once dry, the vibrant hues will capture the light beautifully.
Step 3: Assemble the Flowers
Once the petals are dried, assemble them by layering different sizes to form flowers. Use the hot glue gun to attach the overlapped petals. Be generous with the glue to ensure they stay securely together as you shape them into blooms.
Step 4: Create the Stems (Optional)
If you want your flowers to have stems, you can attach wire to the base of each flower before gluing on the next layer or use the hot glue directly to secure the flowers to a longer stem.
Step 5: Add Lights
To achieve the glowing effect, place your LED tea lights or fairy lights at the center of the jar or in the vase where your flowers will be displayed. Arrange the flowers around the lights and secure them with more glue if needed.
Step 6: Final Touches
Add some decorative ribbon around the neck of the jar or vase to elevate the overall look. This will add a charming touch, especially if it complements the colors of your flowers.

How to Style Your Finished DIY Glowing Faux Stained-Glass Flowers
Once your DIY project is complete, it’s time to display your glowing faux stained-glass flowers. Consider placing them on your mantel as a focal point that reflects your crafting prowess. They also look stunning in a window where sunlight can enhance their vibrancy, or you could even showcase them on your front porch for a welcoming touch.
Imagine your dining table filled with these creations during family dinners or holiday celebrations. Their gentle glow can create a cozy atmosphere that encourages togetherness. Complement these flowers with natural textures like burlap or reclaimed wood to enhance that warm, rustic feel.

Maggie’s Tips for the Best Results
- Dry-fit your petals before gluing them together to ensure they align perfectly.
- Consider layering colors for effects reminiscent of real stained glass.
- Use long-lasting LED lights to avoid overheating concerns, especially in enclosed spaces.
- Don’t worry about imperfections; each flower may have its unique charm.
- Test different arrangements before committing to the final look.
Easy Ways to Customize This Project
You can easily customize your flowers by using different colors or themes. Consider reflecting the changing seasons by adding autumn hues of orange and burgundy for fall or fresh pastels for spring. Incorporating subtle metallic accents, like gold or silver, can add a touch of elegance too.
How to Store Your Flowers
To keep your DIY Glowing Faux Stained-Glass Flowers looking their best, store them in a cool, dry place. If possible, keep them in a protective box or container to shield them from dust and moisture. Proper care ensures that these vibrant creations remain a staple in your seasonal decor for years to come.
FAQs About DIY Glowing Faux Stained-Glass Flowers
Can I use real glass for these flowers?
While real glass would certainly look beautiful, it is not a safe option for a crafting project, especially if children are involved.
How long do the LED lights last?
Most LED tea lights can last several hours, but check the packaging for specific information regarding the battery lifespan.
Are these flowers suitable for outdoor use?
If you use weather-proof materials, these flowers can be displayed outdoors. However, it’s best to bring them inside during inclement weather.
Can I change colors easily?
Yes! You can easily repaint the petals if you’d like to switch colors for different seasons.
Conclusion
Handmaking your DIY Glowing Faux Stained-Glass Flowers can add a wonderfully personal touch to your home. You not only create warm decorations but also cherish the memories made during the crafting process. Each bloom is unique, reflecting your creativity, and they serve as reminders that beauty is found in the handmade imperfections. If you are interested in exploring beautiful panel options to complement your stained glass decor, check out this faux stained glass panel for inspiration.
Print
DIY Glowing Faux Stained-Glass Flowers
- Total Time: 30 minutes
- Makes: Multiple flowers
Description
Create beautiful glowing faux stained-glass flowers to enhance your home decor with this easy DIY project.
Materials
- Clear plastic sheets or cut plastic from old containers
- Glass paint or faux stained glass paint
- Scissors
- Hot glue gun and glue sticks
- LED tea lights or small fairy lights
- Decorative ribbon (optional)
- Wire (optional for stems)
- A glass jar or vase (optional for display)
Instructions
- Prepare your flower shapes by cutting plastic sheets into petal shapes.
- Paint your flower petals using your chosen paint and allow to dry.
- Assemble the flowers by layering different sizes of petals with hot glue.
- Create the stems by attaching wire or securing the flowers to longer stems.
- Add LED tea lights or fairy lights to create the glowing effect.
- Finalize with decorative ribbon around the vase for an elevated look.
Notes
Consider layering colors and experimenting with different arrangements for a unique look.