

DIY Pumpkin Seed Fall Painting for Kids You may also find Diy Fall Window Suncatchers Colorful Pumpkin Theme useful.
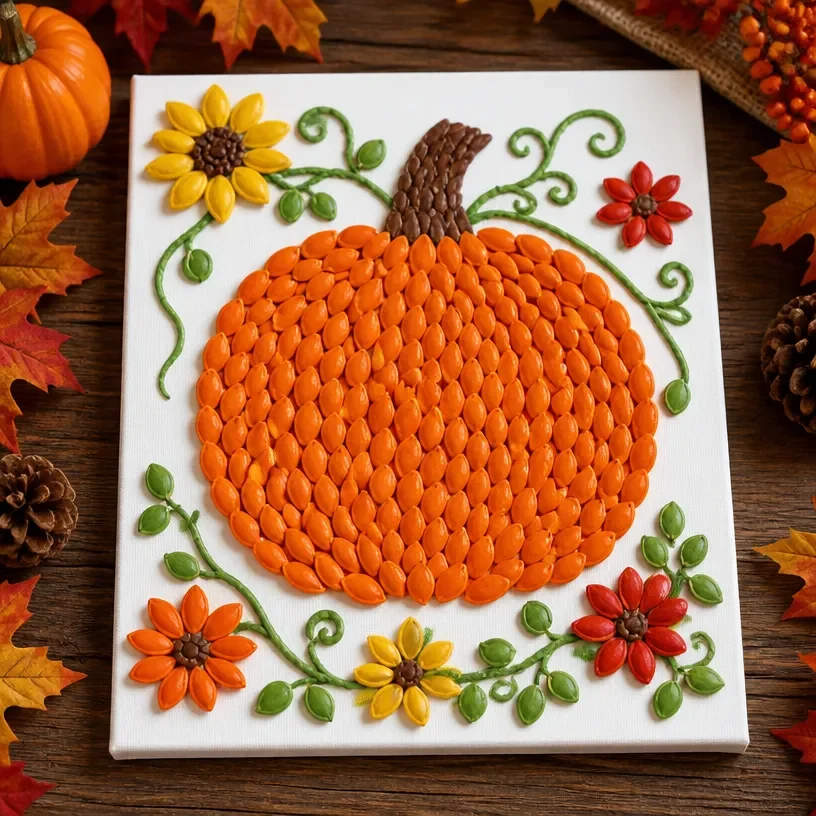
Creating art with natural materials is a delightful way to engage kids and celebrate the beauty of fall. DIY Pumpkin Seed Fall Painting is a charming craft that combines the rustic feel of seasonal decor with the creativity of children. This project not only encourages artistic expression but also allows for a hands-on experience with items often overlooked in the kitchen. The final piece can be displayed on a mantel, wall, or in a child’s room, adding a personal and colorful touch to your fall decorations. It’s a simple process that parents can enjoy alongside their kids, making it a wonderful bonding activity. You may also find Diy Rainbow Panda Fall Leaf Craft Kids useful.
By using pumpkin seeds, this craft incorporates elements of nature and provides a unique texture and visual interest. The vibrancy of the paint is sure to bring joy and warmth to any space. Plus, utilizing seeds that might otherwise be discarded teaches kids about sustainability and creativity. If you’re looking for other fun fall projects, consider exploring this easy DIY fall leaf suncatcher garland.
Why You’ll Love This Project
This DIY Pumpkin Seed Fall Painting is truly special for several reasons. First, it offers an approachable way for children to express their creativity without the pressure of perfection. The materials are inexpensive and often found at home, making this an affordable project to enjoy. The pumpkin seeds add a lovely texture, and children can customize their designs to reflect their personality and style.
The versatility of the artwork means it can fit into various decor themes, from farmhouse charm to playful autumn aesthetics. Plus, it’s a great way to decorate spaces such as doorways, tabletops, or even children’s art displays at school.

Before You Start
Before diving into the art, it’s helpful to visualize what your finished piece will look like. Imagine a colorful canvas dotted with charming pumpkin seeds and painted in warm autumn hues. Spend a little time setting up your workspace to ensure everything is within reach this will help keep the project flowing smoothly.
It’s important to decide on the paint scheme beforehand, which will guide the arrangement of the seeds. Working with children means you’ll often have surprises, so keeping flexibility in mind can enhance the fun. As you begin, remember that the beauty of this craft lies in its handmade imperfections, encapsulating the warmth of the season.
“A handmade touch makes every home feel warmer.”
Materials and Supplies
Materials and Supplies
- Pumpkin seeds (clean and dry)
- Acrylic paints in autumn colors (orange, yellow, brown, green)
- A canvas or sturdy paper
- Paintbrushes (various sizes)
- Water cups for rinsing brushes
- Paper towels
- Glue (optional, for securing seeds)
- A palette or paper plate for mixing paints
When selecting your paint, opt for vibrant colors that reflect the beauty of fall leaves and pumpkins. The type of canvas or paper can vary, but heavier materials will hold up better during the painting process.
How to Make DIY Pumpkin Seed Fall Painting for Kids
Step 1: Prepare the Workspace
Start by laying down protective materials over your workspace. This could be newspaper or a plastic tablecloth, as paint can get messy. Gather all the materials you’ll need so everything is readily available.
Step 2: Create a Base Layer
Using a paintbrush, apply the base coat of paint to the canvas or paper. Encourage the kids to use broad strokes and cover the entire surface, letting creativity flow. This can be a solid color or a blend of colors that represent a warm autumn day.
Step 3: Plan the Seed Placement
Once the base layer is dry, it’s time to arrange the pumpkin seeds. Kids can layout the seeds in various patterns, whether it be shapes like leaves or pumpkins, or even freeform designs. This step allows for open-ended creativity, so let them take the lead.
Step 4: Paint the Seeds
Once the layout is decided, the fun continues! Kids can paint the pumpkin seeds in different autumn colors to create a lively, textured look. Encourage them to think about how they want to combine colors and designs on each seed, fostering unique artistic expression.
Step 5: Secure the Seeds
After the paint has dried, if needed, you can use a glue to secure the seeds onto the canvas. This is especially useful if they will be hung or displayed in a windy location. Allow everything to dry fully before showcasing the masterpiece.

How to Style Your Finished DIY Pumpkin Seed Fall Painting for Kids
Once the painting is complete, it’s time to display your children’s delightful artwork. Consider placing it on the mantel, as part of your Thanksgiving table settings, or hanging it in a prominent place in their room.
Pair the artwork with complementary decor such as small pumpkins, fall leaves, or even candles in warm tones. The placement should feel inviting and contribute to a cozy atmosphere in your home, reflecting your family’s unique character and warmth.

Maggie’s Tips for the Best Results
- Encourage creativity: Let them freely express their ideas there is no wrong way to paint pumpkin seeds.
- Ensure the paint is fully dry before moving steps along to avoid smudged designs.
- Keep a few extra seeds on hand for children who may want to add or change their design at any time.
- If younger kids struggle with paint brushes, they can use fingers to create fun textures and patterns.
- For additional texture, consider layering the seeds after the paint has dried for a more dynamic piece.
Easy Ways to Customize This Project
- Experiment with color: Introduce non-traditional fall colors, such as purples or blues, for a playful twist.
- Decorate with additional items: Integrating small twigs or leaves can enhance the natural feel of the artwork.
- Experiment with mediums: Instead of painting, kids could use markers or crayons to create their designs if paint feels too messy.
- Try different patterns: Change up the seed arrangements to create various forms, such as animals or shapes related to the season.
How to Store Your Artwork
To keep your pumpkin seed painting looking fresh, store it in a dry, cool area away from direct sunlight, which can cause fading. Avoid stacking anything on top of it to prevent crushing the seeds. If using a canvas, hanging it in a dedicated space can help keep it protected while enjoying its seasonal charm.
FAQs About DIY Pumpkin Seed Fall Painting for Kids
What types of paints can I use?
Acrylic paints are best as they adhere well to surfaces and dry quickly.
Can I use real pumpkin seeds?
Yes, fresh pumpkin seeds can create a unique look, but make sure they are thoroughly dried to prevent spoilage.
How long does it take for the paint to dry?
Typically, acrylic paint takes 1-2 hours to dry completely, but this can vary based on humidity levels.
Can this project be done outside?
Sure! Just make sure to protect the surrounding area from paint spills and beware of wind.
A Handmade Touch for the Season
DIY Pumpkin Seed Fall Painting for Kids is a heartwarming craft that brings families together during the beautiful autumn season. Not only does it nurture creativity, but it also imparts valuable life lessons about recycling and using everyday materials. The joy of seeing your child’s artwork displayed proudly in the home adds a touch of love to your seasonal decor. Remember, handmade projects don’t have to be perfect; their charm lies in their uniqueness and the memories created during the process.
For more fall crafting ideas, explore this collection of 38 easy fall crafts for kids that can complement your pumpkin seed masterpiece.
Print
DIY Pumpkin Seed Fall Painting for Kids
- Total Time: 105 minutes
- Makes: 1 finished artwork
Description
A delightful craft that combines artistry and nature, perfect for celebrating fall with your children.
Materials
- Clean and dry pumpkin seeds
- Acrylic paints in autumn colors (orange, yellow, brown, green)
- A canvas or sturdy paper
- Various sizes of paintbrushes
- Water cups for rinsing brushes
- Paper towels
- Glue (optional, for securing seeds)
- A palette or paper plate for mixing paints
Instructions
- Prepare the workspace by laying down protective materials and gathering all materials needed.
- Create a base layer by applying a coat of paint on the canvas or paper using a paintbrush.
- Plan the seed placement after the base layer dries, arranging seeds in various patterns.
- Paint the seeds in different autumn colors to create texture and vibrancy.
- Secure the seeds with glue, if desired, and allow it to dry fully before displaying.
Notes
Let kids express their creativity freely, and encourage experimentation with color and patterns.