


Creating a DIY Tie-Dye Bat Garland using coffee filters is a delightful way to add a spooky yet charming touch to your Halloween decor. This project combines simple materials with imaginative flair, allowing you to create an eye-catching garland that can be draped over your mantel, doorframe, or even across a spooky table setting. The best part about this craft is its accessibility; with minimal supplies and a straightforward process, it’s perfect for crafters of all skill levels. You may also find Diy Rainbow Ghost Cupcake Liner Garland Halloween Decor useful.
With the vibrant colors and whimsical bat shapes, this garland brings a playful element to Halloween festivities. Plus, it’s a fantastic way to involve your family in seasonal decorating, making lasting memories while crafting together. If you’re eager to create more festive decorations, you might enjoy exploring how to make a colorful ghost garland that complements this bat theme beautifully.
Why You’ll Love This Project
This DIY Tie-Dye Bat Garland is not just a playful addition but also an enjoyable crafting experience. You’ll appreciate how easy it is to create; the construction involves folding and dyeing, making it an approachable task. The materials are inexpensive, as you likely already have coffee filters and some basic supplies at home, which means you can craft without stretching your budget. You may also find Bottle Cap Spider Garland Halloween Decor useful.
The versatility of this project is another highlight. Customize the colors of your bat garland to match your existing Halloween decor or go wild with vibrant hues to create a standout piece. It’s perfect for decorating a mantel, your porch, or even a Halloween party. Plus, as the seasons change, you’ll find that this style can easily transition into other themes, making it a staple in your holiday crafting repertoire.

Before You Start
Before diving into making your DIY Tie-Dye Bat Garland, it’s helpful to visualize how your finished project will look. Aim for a festive arrangement where the bats appear lively and whimsical. Pay attention to the dye techniques; this part will truly bring your bats to life with vibrant colors.
Having an organized workspace can also make assembly easier. Lay out all your materials so they’re within reach, including a protective surface for any dye spills.
“A handmade touch makes every home feel warmer.”
With a simple setup and clear vision, you’ll be ready to create your garland in no time.
Materials and Supplies
Materials and Supplies
- Coffee filters
- Liquid fabric dye (multiple colors)
- Spray bottle
- Water
- Black construction paper or cardstock for bat shapes
- Scissors
- String or twine for hanging
- Hot glue or double-sided tape
- Sponge brush or paintbrush (optional for dye application)
Using liquid fabric dye allows for vibrant colors that will stand out beautifully. You may consider using a sponge brush for more precise dye placement on the coffee filters if you prefer a more controlled approach.
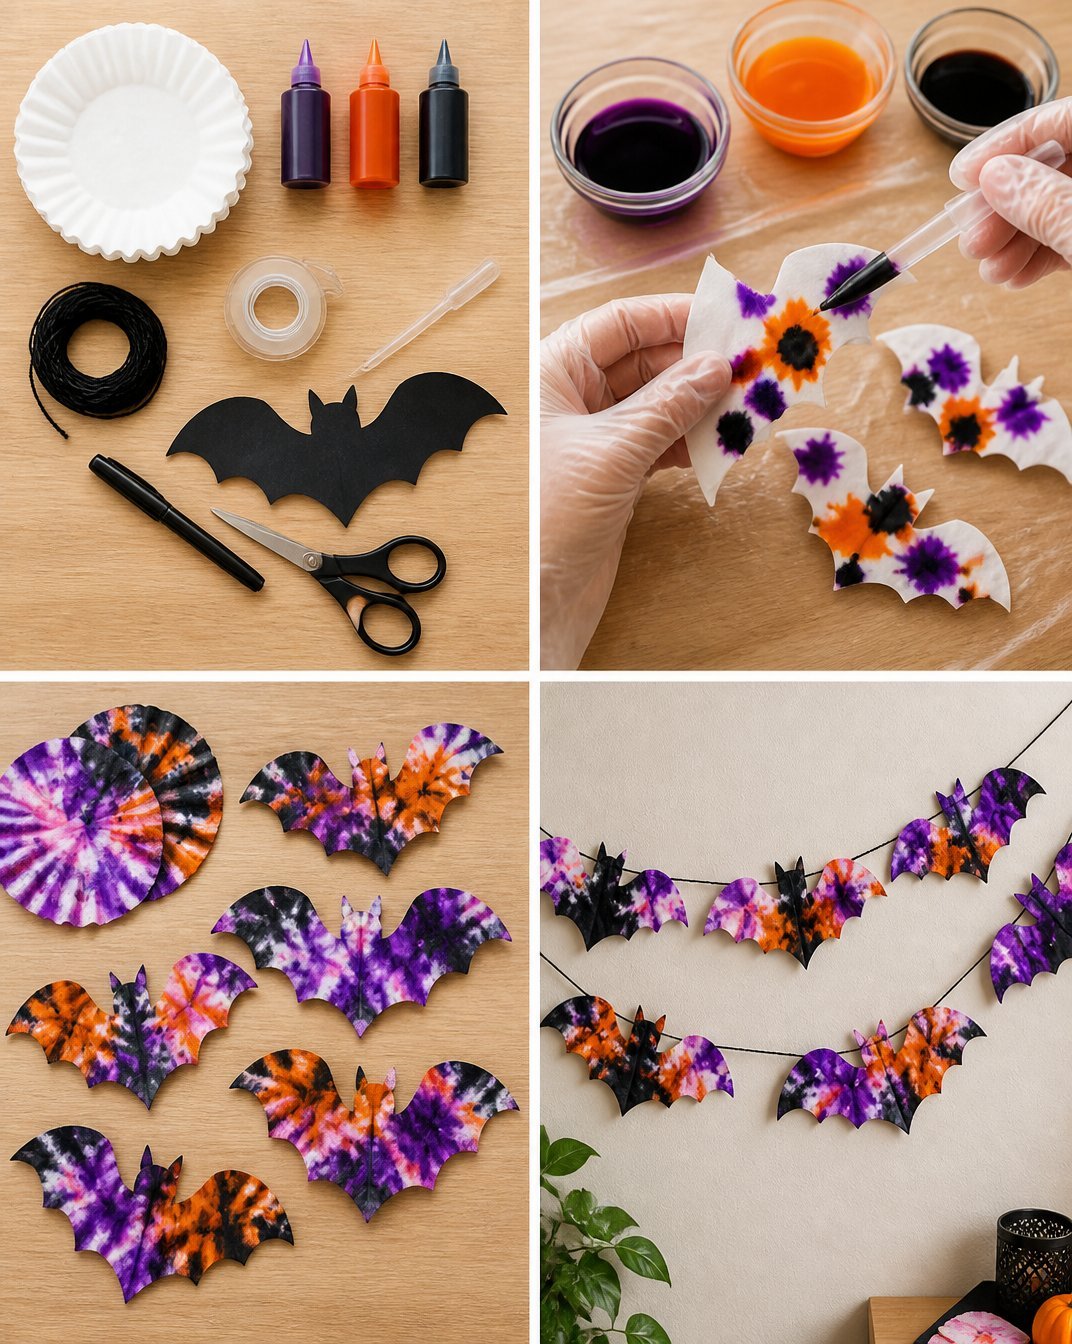
How to Make DIY Tie-Dye Bat Garland Using Coffee Filters for Halloween Decor
Step 1: Prepare Your Workspace
Clear a space and lay down newspaper or plastic to catch any dye spills. Gather all supplies together so you can work efficiently.
Step 2: Dye the Coffee Filters
- Mix Dye: In a spray bottle, combine liquid dye with water as per the dye instructions.
- Spray Filters: Lay out your coffee filters in a single layer and spray them with the dye mixture. Let the colors blend for that tie-dye effect.
- Drying Time: Allow the filters to dry completely, ideally in a well-ventilated area. This can take a couple of hours.
Step 3: Create Bat Shapes
- Cut Bat Shapes: Once your coffee filters are dried, fold the black construction paper in half and draw a bat shape on one side. Cut it out, maintaining the fold.
- Trace the Bat Shape: Use this bat as a template to trace and cut additional bats from your paper.
Step 4: Assemble the Garland
- Attach Bats to Filter: Using hot glue or double-sided tape, attach the batted shapes to the back of the dyed coffee filters.
- String the Bats: Once glued, take your string or twine, and place the bat filters at intervals along your string. You can mix the bat sizes for a varied look or keep them uniform for a classic style.
Step 5: Hang Your Garland
- Display It: Find a prominent place to hang your garland, such as over your fireplace, on a wall, or draped over furniture. Adjust them for the best visual effect.
How to Style Your Finished DIY Tie-Dye Bat Garland Using Coffee Filters for Halloween Decor
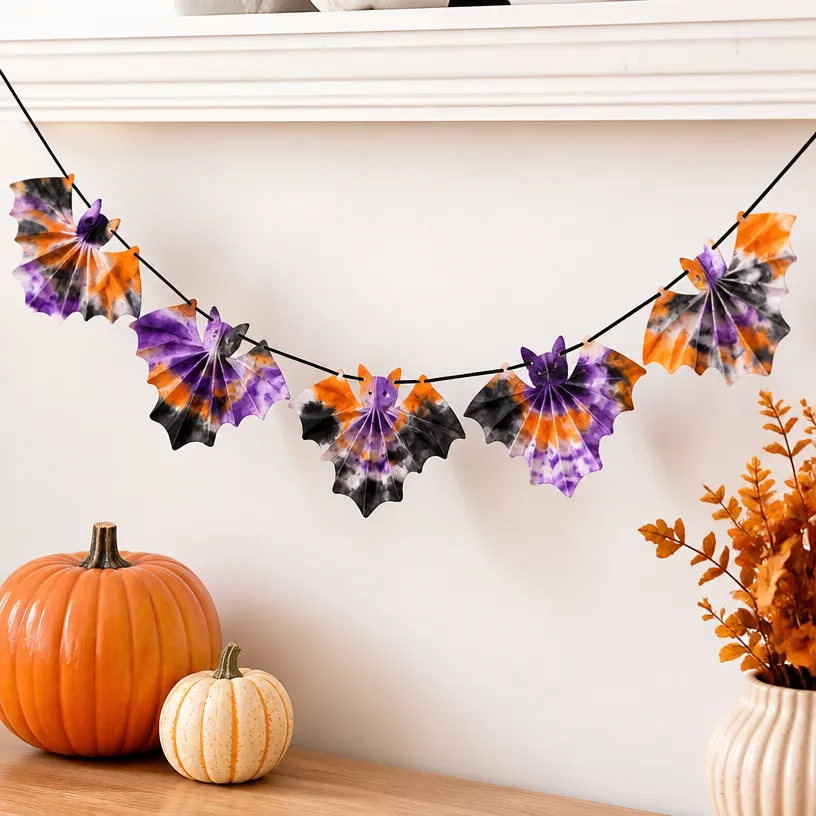
The finished DIY Tie-Dye Bat Garland can be a striking spectacle in your home. Consider placing it above your mantel to welcome guests or hanging it in your entryway to create a festive atmosphere right from the moment they arrive. Complement it with other decor like small pumpkins or spooky lights to enhance your Halloween theme.
This garland also looks great on a table, where it can be intertwined with candles and other fall decorations. Remember to maintain balance with your other decor; a few bats can set the mood without overwhelming your space.
Maggie’s Tips for the Best Results
- Dry-Fit Before Gluing: Lay out your bats along the string before permanently attaching them to finalize placement.
- Experiment with Dye Techniques: Try different spraying methods for unique patterns and textures.
- Use Varying Sizes: Mix small and large bats to create an engaging visual display.
- Protect Your Surfaces: Always cover work surfaces when dealing with dyes to avoid any mess.
- Allow Time for Drying: Make sure the coffee filters dry thoroughly before attaching them to avoid slipping or mess.
Easy Ways to Customize This Project
Feel free to innovate with color combinations that fit your decor. Consider using seasonal colors, such as deep reds and greens for a fall vibe or metallic accents for a glam look. Additionally, you could embellish the bats with glitter or even paint features on them for extra flair. Play around with different shades of dye and the arrangement of your bats to make the garland uniquely yours.
How to Pack This Project Away for Next Season
When the Halloween season wraps up, consider storing your bat garland in a cool, dry place. Gently tuck it in a box with acid-free tissue paper to maintain its shape. Avoid folding the bats sharply, as that could crease them. With proper care, you’ll be able to reuse this charming decoration for many Halloweens to come.
FAQs About DIY Tie-Dye Bat Garland Using Coffee Filters for Halloween Decor
Can I use other types of dye for this project?
Yes, fabric dye works best for vibrant colors, but you can experiment with watercolor or food coloring if you prefer.
How should I store my garland after Halloween?
Gently wrap the garland in acid-free tissue paper and store it in a cool place to keep it safe.
Can this project be exposed to outdoor conditions?
While the garland can hang outdoors, it’s best to bring it inside if there’s rain or high humidity to maintain its appearance.
How can I change the colors of the bat garland?
You can simply re-dye new coffee filters or create new bats with different shades to keep your decor fresh.
Can I make this garland in larger sizes?
Absolutely! Simply scale up the bat template to create a striking centerpiece suitable for larger spaces.
A Handmade Touch for the Season
There’s something uniquely rewarding about engaging in seasonal crafts, especially as you create decorations that will transform your home for Halloween. Remember that the perfection lies in the handmade nature of your projects. Allow the small imperfections to add character to your decor, making it all the more meaningful. As you gather your loved ones around this colorful garland, you’ll be sharing a piece of creativity and warmth that embodies the spirit of the season.
If you’re looking for more creative inspirations with coffee filters, check out 30 fun and creative coffee filter crafts for kids.
Print
DIY Tie-Dye Bat Garland
- Total Time: 135 minutes
- Makes: 1 garland
Description
Create a charming DIY Tie-Dye Bat Garland using coffee filters and vibrant fabric dye for a delightful Halloween decoration.
Materials
- Coffee filters
- Liquid fabric dye (multiple colors)
- Spray bottle
- Water
- Black construction paper or cardstock for bat shapes
- Scissors
- String or twine for hanging
- Hot glue or double-sided tape
- Sponge brush or paintbrush (optional for dye application)
Instructions
- Prepare your workspace with protective covering for spills.
- Mix the dye in a spray bottle with water according to instructions.
- Spray coffee filters with the dye mixture, allowing colors to blend.
- Dry the coffee filters completely in a ventilated space for a couple of hours.
- Cut bat shapes from black construction paper using a folded technique.
- Trace the bat shape for additional bats from your template.
- Attach bats to dyed coffee filters using hot glue or tape.
- String the bat filters along your chosen twine or string.
- Display your garland in a prominent location and adjust for visual appeal.
Notes
Experiment with dye techniques and bat sizes for a unique look. Protect surfaces while crafting and ensure filters are completely dry before assembly.