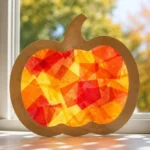
Description
A delightful and simple craft project to create colorful translucent pumpkin decorations for your windows this fall.
Materials
- Colored tissue paper (orange, green, yellow)
- Scissors
- Water-based glue or Mod Podge
- A paintbrush (for applying glue)
- String or fishing line (for hanging)
- Black marker (for facial features)
- Pencil
- Bowl of water (for wetting the tissue)
Instructions
- Cut the tissue paper into squares that are approximately 5×5 inches.
- Prepare the pumpkin shape using a pencil by drawing a rounded form on a piece of sturdy paper.
- Apply glue onto a small section of your pumpkin shape with your paintbrush.
- Place a tissue paper square on top of the glue and press it down gently.
- Layer additional pieces of tissue, overlapping edges until covered.
- Add facial features with a black marker once dry.
- Create a hanging mechanism by cutting a length of string and gluing it to the top of the pumpkin.
- Display your pumpkins in windows or around your home.
Notes
Use good-quality tissue paper for vibrant colors and durability. Consider adding embellishments for customization.