

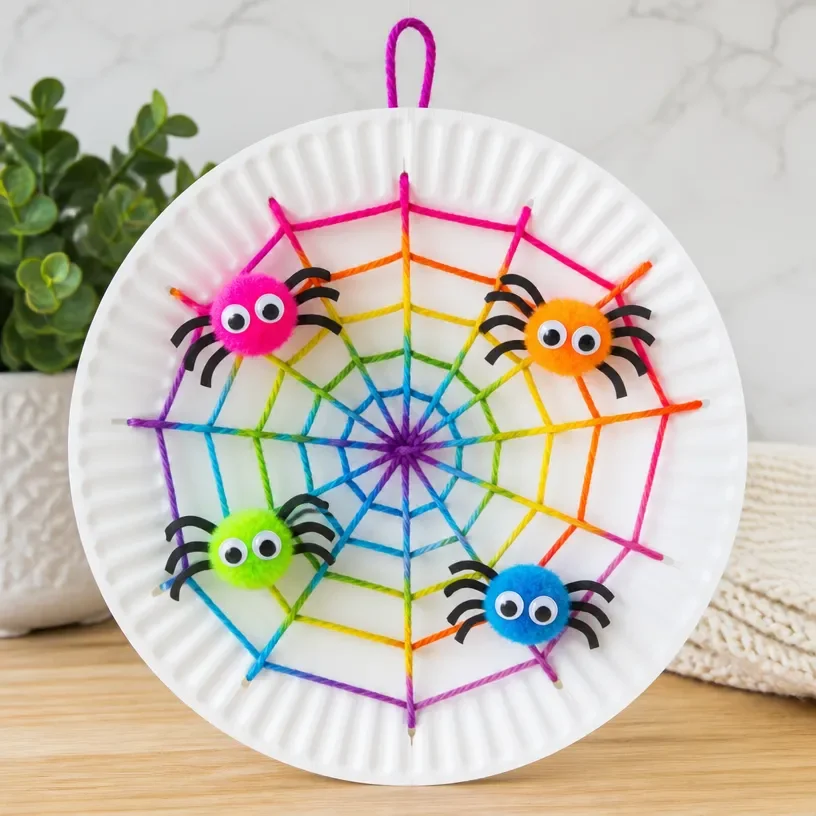
The Rainbow Spiderweb Paper Plate Wreath is a delightful seasonal project that brings a splash of color and creativity to your home. This project not only provides a fun crafting experience, but it also results in a charming decoration that can brighten up your space for Halloween or any autumn gathering. Made from simple materials like paper plates and colorful decorations, this wreath is approachable for any home crafter, regardless of skill level. You may also find Autumn Leaf Wreath Diy Rainbow Puppy Paw Prints useful.
Creating this wreath allows you to infuse your decorative style with warmth and cheer. Its playful design makes it perfect for adorning your front door or hanging in an entryway to welcome guests. By working on this wreath, you’re also spending quality time crafting, which is an activity that adds personality to your home decor. For other fun projects, you might also love making an Halloween wreath or a bright autumn centerpiece.
Why You’ll Love This Project
The Rainbow Spiderweb Paper Plate Wreath is appealing for many reasons. First, it uses inexpensive and easily sourced materials, making it a budget-friendly choice. The whimsical design permits plenty of room for personal creativity, allowing you to pick colors and decorations that align with your own seasonal aesthetic. You may also find Autumn Rainbow Pumpkin Patch Suncatcher useful.
Another great aspect of this project is its versatility. You can adapt it for various holidays or seasonal themes, making it relevant beyond just Halloween. Whether you hang it on your front door, display it on a porch, or set it above a fireplace mantel, it offers a delightful touch to your home’s decor.

Before You Start
Before diving into creating your wreath, picture how it will look once finished. The completed piece should evoke a cozy, festive feeling, characterized by its vibrant colors and playful design. Pay particular attention to the arrangement of colors and materials, which will significantly impact the overall look.
To make your crafting easier, gather all your supplies ahead of time and prepare your workspace by clearing a flat surface. It also helps to dry-fit your pieces before adhering them, allowing you to visualize the final arrangement without commitment.
“A handmade touch makes every home feel warmer.”
Materials and Supplies
Materials and Supplies
To craft your Rainbow Spiderweb Paper Plate Wreath, you will need the following materials:
- Paper plates (two, large)
- Black paint or markers
- Colorful tissue paper or other decorative embellishments
- Scissors
- Hot glue gun and glue sticks
- Ribbon (for hanging)
- Optional: Mod Podge for sealing
Choosing the right materials is vital. Try to use vibrant colors for your tissue paper to make the wreath pop. If using paint, consider a matte finish for a more rustic feel.
How to Make Rainbow Spiderweb Paper Plate Wreath Tutorial
Let’s get started with creating your wreath:
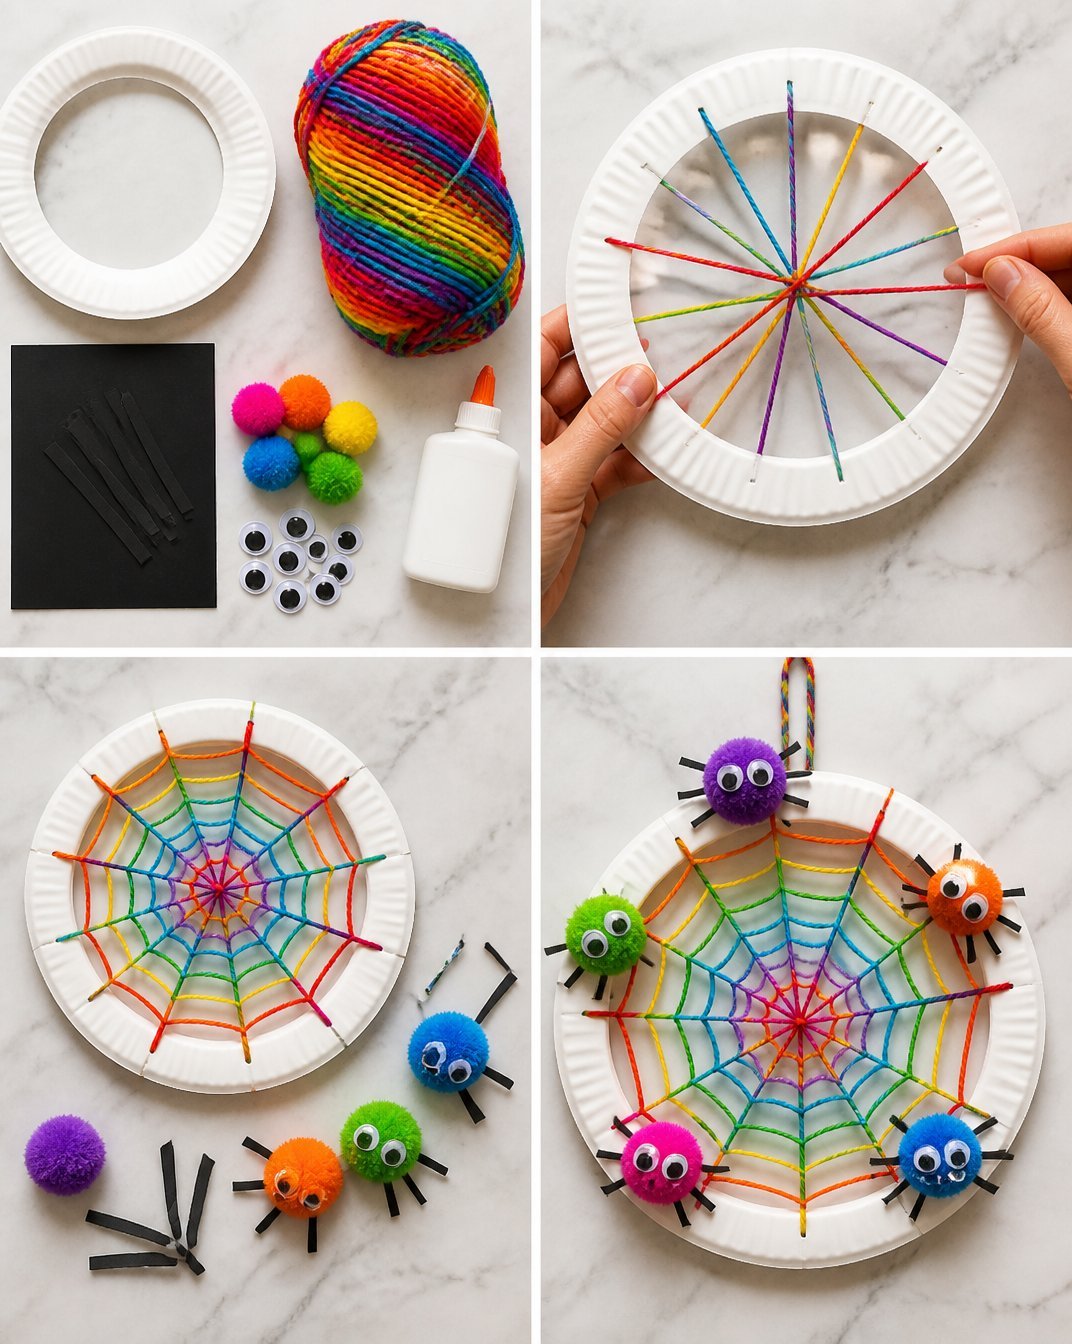
Step 1: Prepare the Base
Begin by taking your two paper plates and cutting out the center of each. This will create the base of your wreath. Set aside the circular outer rings, as these will be glued together later.
Step 2: Create the Spiderweb Design
Next, using black paint or markers, color the inner areas of the rings to form the spiderweb design. If you want, you can add extra detail by drawing lines radiating from the center toward the edges.
Step 3: Assemble the Wreath
Once the paint dries, take the two outer rings and glue them together. Make sure the spiderweb designs are aligned in the same direction for a cohesive look.
Step 4: Add Colorful Decorations
Now, take the colorful tissue paper (or other decorations) and cut them into fun shapes like leaves, spirals, or random patches. Use your hot glue gun to attach these pieces all around the wreath, allowing for a vibrant contrast to the black spiderweb.
Step 5: Hang with Ribbon
Finally, take a piece of ribbon and hot glue it to the top center of your wreath. This will serve as your hanging method. Make sure it is securely glued so that the wreath hangs without slipping.
How to Style Your Finished Rainbow Spiderweb Paper Plate Wreath
Once your Rainbow Spiderweb Paper Plate Wreath is complete, find the perfect spot to display it. The entryway is an ideal place, offering a warm welcome to visitors. Hanging it on your front door will surely catch the eyes of those passing by, while placing it on a mantel can create a charming focal point in your living room.
To complement your wreath, consider using seasonal decor like small pumpkins or ghosts around the base for added festivity. Keep the arrangement simple to maintain the warmth and welcoming feeling that handmade decor can bring.
Maggie’s Tips for the Best Results
- Take your time when cutting out the paper plate centers; a steady hand will deliver cleaner edges.
- Work in layers when glueing on the colorful decorations to add depth and interest.
- Let any paint dry completely before adding the tissue paper.
- Balance your decoration placement evenly around the wreath for a harmonious look.
Easy Ways to Customize This Project
You can easily customize your wreath by changing the colors of the decorations or adding extra elements. Consider using pastel shades for a spring version, or traditional colors like orange and purple for Halloween. Ribbons can also vary try lace or burlap for a rustic twist.
How to Store Your Wreath
To keep your Rainbow Spiderweb Paper Plate Wreath looking fresh, store it in a dry place. If you plan to reuse it next season, wrap it in tissue paper to avoid crushing delicate embellishments.
FAQs About Rainbow Spiderweb Paper Plate Wreath Tutorial
Can I use other types of paper for this project?
Yes, you can use patterned paper or cardstock for a different aesthetic.
Is it suitable for outdoor use?
If the materials are sealed with Mod Podge or similar products, it may withstand light outdoor conditions, but it’s best kept indoors.
How long does this project take?
The total time can vary, but on average, allow 2-3 hours including drying time for paint.
Can I use different adhesives?
While hot glue works perfectly, craft glue can be an alternative, keeping in mind that it may take longer to dry.
Can I hang this wreath year-round?
Absolutely! With some color changes, it can transition beautifully through the seasons.
A Handmade Touch for the Season
Creating a Rainbow Spiderweb Paper Plate Wreath is not only about crafting but also about bringing a touch of personality to your home. There’s something special about making decorations by hand that adds warmth and charm to any living space. Remember, the best creations don’t have to be flawless they should reflect the love and creativity you put into them.
If you’re interested in finding other craft projects, check out the Spider Web Wreath craft activity guide for more inspiration!
Print
Rainbow Spiderweb Paper Plate Wreath
- Total Time: 130 minutes
- Makes: 1 wreath
Description
A colorful and creative wreath project perfect for Halloween or autumn gatherings.
Materials
- Paper plates (two, large)
- Black paint or markers
- Colorful tissue paper or other decorative embellishments
- Scissors
- Hot glue gun and glue sticks
- Ribbon (for hanging)
- Optional: Mod Podge for sealing
Instructions
- Prepare the Base by cutting out the center of each paper plate.
- Create the Spiderweb Design using black paint or markers.
- Assemble the Wreath by gluing the two outer rings together.
- Add Colorful Decorations by cutting tissue paper into fun shapes and gluing them around the wreath.
- Hang with Ribbon by hot gluing it to the top center for displaying.
Notes
Customize your wreath with different colors for each season.