


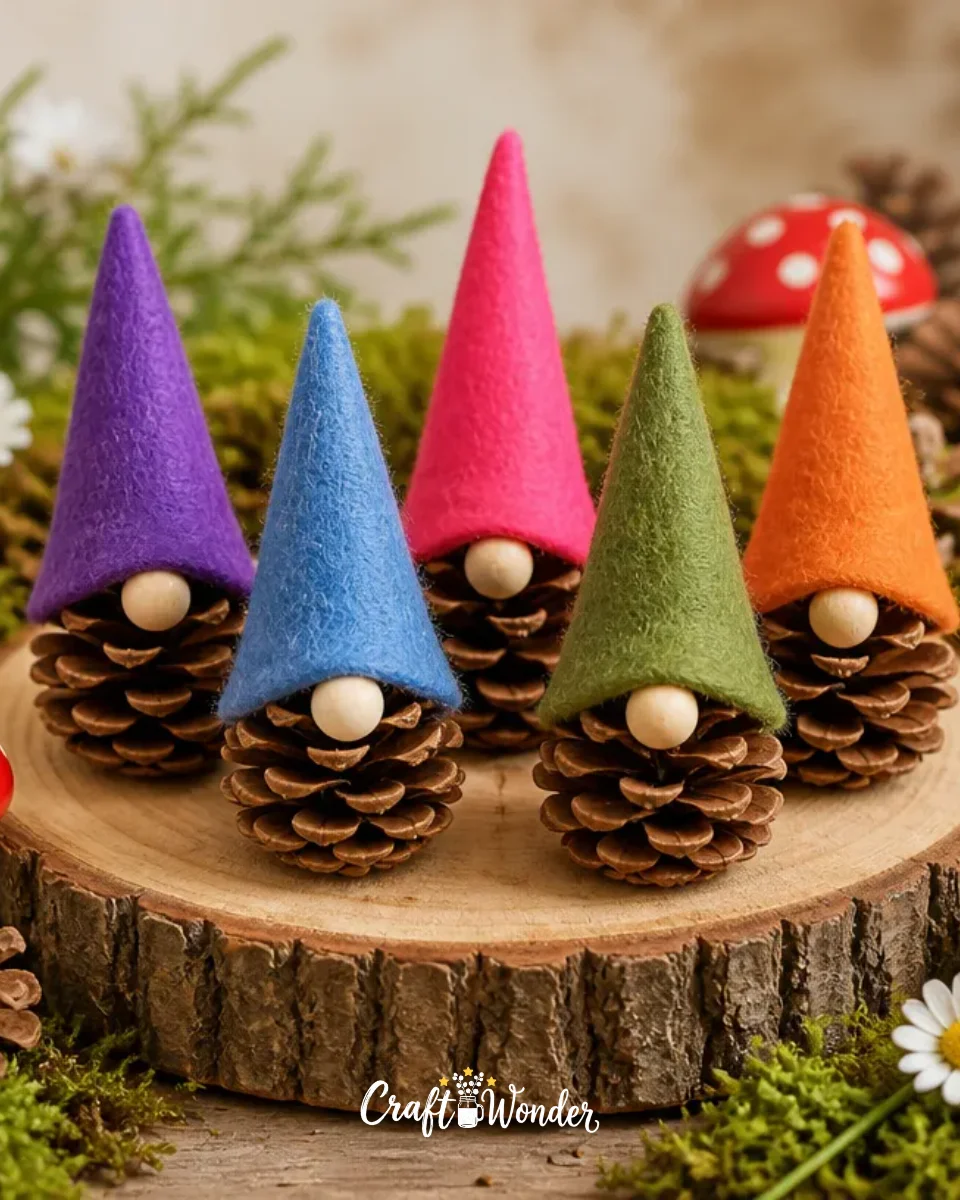
Creating whimsical DIY Pinecone Gnomes is a delightful way to celebrate the changing of seasons this fall and Christmas. This project combines natural elements with charm, making it perfect for adding character to your home decor. Pinecone gnomes can be displayed on a mantel, as part of a seasonal centerpiece, or even placed in unexpected corners of your home to bring a touch of warmth and whimsy. You may also find Easy Diy Fall Leaf Suncatcher Garland For Kids useful.
This budget-friendly craft is approachable for crafters of all skill levels. You’ll enjoy working with simple materials like pinecones, fabric, and glue, which are usually easy to find. Plus, you can customize your gnomes to suit your personal style, ensuring that they resonate with your home’s theme and ambiance. You may also find Diy Rainbow Panda Fall Leaf Craft Kids useful.
Why You’ll Love This Project
DIY Pinecone Gnomes bring a handmade touch to any decor style, especially for those embracing rustic farmhouse charm. One of the best parts about this project is that it’s inexpensive and uses materials that are often found in nature. This craft not only brings seasonal cheer but also allows for creativity as you can personalize the gnomes with colors and accessories to match your existing decor. You may also find Easy Diy Paper Plate Fish Craft For Kids useful.
Additionally, these gnomes can be a versatile addition to your home. Whether placed on a shelf, in a holiday display, or incorporated into porch decor, they add a whimsical touch that fits seamlessly into various settings. Plus, children and adults alike can enjoy crafting them together, making it a perfect family activity.
Before You Start
Before diving into the crafting, take a moment to visualize your finished pinecone gnomes. Aim for a cozy, charming look that complements the natural textures of the pinecones. The gnome hats, which can be made from fabric or felt, will have a significant impact on their appearance, so deciding on colors and patterns beforehand can make assembly smoother. Having your workspace organized with all materials at hand will also help streamline the crafting process.
“A handmade touch makes every home feel warmer.”
Materials and Supplies
Materials and Supplies
- Pinecones (freshly gathered or dried)
- Fabric or felt (for gnome hats)
- A small wooden ball (for the nose)
- Craft glue or hot glue gun
- Scissors
- Optional: Buttons, ribbons, or other embellishments for decoration
Choosing the right types of fabric can significantly enhance the overall appearance of your gnomes. You might opt for soft textiles that give a cozy feel, or utilize burlap for a more rustic look. Additionally, consider the size of your pinecone when selecting the wooden balls; a fitting nose size can make a huge difference in the final look.
How to Make DIY Pinecone Gnomes: Easy Budget-Friendly Craft for Fall and Christmas
Gather Your Materials: Ensure you have everything laid out on your work surface.
Prepare the Pinecone: Depending on the size of your pinecone, you may want to carefully clean it to remove any debris. This will also help it stand out beautifully when you embellish it.
Create the Gnome Hat: Cut a piece of fabric or felt into a triangle shape. You can decide its height based on how large you want the hat to sit above the pinecone.
Attach the Hat: Form the triangle into a cone shape, then secure it with glue and place it over the pinecone. You can let the tip fall down for a whimsical effect or keep it upright.
Add the Nose: Glue the wooden ball to the front of the pinecone about where the “face” should be. This can be at the base of the hat for style and character.
Decorate: Use buttons, ribbons, or any embellishments to add personality to your gnome. This is where you can truly express your creativity.
Final Touches: Let everything dry completely before displaying your pinecone gnomes in your home.

How to Style Your Finished DIY Pinecone Gnomes: Easy Budget-Friendly Craft for Fall and Christmas
Once your gnomes are complete, it’s time to find the perfect spot for them in your home. They look wonderful on a mantelpiece or as part of a larger seasonal display on your dining table. Consider grouping them with other natural elements like small pumpkins or seasonal florals for an inviting centerpiece. They also work well among outdoor porch decor, bringing a friendly touch to your entryway.
Another creative way to display your gnomes is on shelves, where they can become a charming part of your everyday décor. They invite warmth and welcome, embodying the spirit of handcrafting.

Maggie’s Tips for the Best Results
- Dry-Fit Before Gluing: Before you commit with hot glue, dry fit all elements to see how everything balances and looks together.
- Layer Up: For a more three-dimensional look, try adding varying heights with your gnomes.
- Keep it Simple: Embrace the imperfections of handmade craft; they add character!
- Work in Groups: Creating a small family of gnomes can make for a delightful display.
- Seasonal Themes: Consider changing the color palette of the hats to reflect different seasons, like vibrant colors for fall or frosty blues for winter.
Easy Ways to Customize This Project
- Choose fabric patterns that resonate with your home’s decor style, such as floral prints for spring or plaid for a cozy winter vibe.
- Attach small seasonal decorations to the hat, like tiny ornaments for Christmas or leaves for fall.
- Customize the gnome faces with different nose sizes or fabric choices for hat embellishments.
How to Care for Your Handmade Decor
Caring for your pinecone gnomes will help maintain their beauty. These pieces can collect dust, so a gentle wipe with a damp cloth will keep them looking fresh. Since they are natural materials, keep them in a dry space to avoid moisture damage. If you plan to store them for future seasons, wrap them carefully in tissue paper to preserve their shape.
FAQs About DIY Pinecone Gnomes: Easy Budget-Friendly Craft for Fall and Christmas
Can I use real pinecones?
Yes, both real and dried pinecones work well for this project, just make sure they’re clean.
What other materials can I use for noses?
You can use beads, small stones, or any suitable materials you have on hand.
How long does it take for the glue to dry?
Allow about 30 minutes for the glue to set completely, but it’s best to leave the gnomes undisturbed for a few hours.
Are these gnomes suitable for outdoor use?
They should be kept indoors or protected outdoors, as natural materials can be susceptible to the weather.
A Handmade Touch for the Season
Creating your own DIY Pinecone Gnomes is not just about crafting; it’s about making something meaningful to decorate your home. These whimsical figures add a personal touch that store-bought items simply cannot match. Celebrate the charm of handmade creations in your space, and remember that it’s the little details that make a home inviting. Embrace imperfections and enjoy every moment of the crafting process.
For more seasonal crafting inspiration, consider exploring Easy Christmas Crafts for Adults in 30 Minutes or Less!
Print
DIY Pinecone Gnomes
- Total Time: 45 minutes
- Makes: 4 gnomes
Description
Create charming DIY Pinecone Gnomes using natural materials to celebrate fall and Christmas.
Materials
- Pinecones (freshly gathered or dried)
- Fabric or felt (for gnome hats)
- A small wooden ball (for the nose)
- Craft glue or hot glue gun
- Scissors
- Optional: Buttons, ribbons, or other embellishments for decoration
Instructions
- Gather your materials: Ensure you have everything laid out on your work surface.
- Prepare the pinecone: Clean it to remove any debris.
- Create the gnome hat: Cut fabric or felt into a triangle shape.
- Attach the hat: Form the triangle into a cone shape and secure it with glue over the pinecone.
- Add the nose: Glue the wooden ball to the front of the pinecone.
- Decorate: Use buttons, ribbons, or any embellishments to add personality.
- Final touches: Let everything dry completely before displaying your gnomes.
Notes
Dry-fit all elements before gluing to ensure balance. Embrace the imperfections of handmade crafts.